Maintaining Bank Accounts
Use the Bank Accounts form to maintain the information for the accounts at financial institutions used in PrismHR.
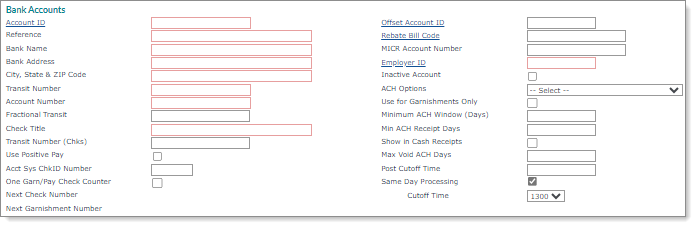
Entering Bank Account Information
Enter the basic information about the account in the Bank Accounts panel. For example:
Note: The 00 Checking Account is a special purpose account, the master account for all transactions. Each file header shows the 00 Checking Account as the main file header, with the funds being transferred into the account from whatever checking account the individual ACH shows it is processed. This adds a level of abstraction to the process, but allows a single account to process all the ACH clearing with only summary transactions from each of the actual checking accounts.
To maintain account information:
|
1.
|
Enter or select the bank Account ID for this account. It must be an integer. |
|
2.
|
Enter a Reference for the name of the financial institution where this account is maintained, as well as any other information. For example, Payroll Cash Account at Fleet Bank. |
|
4.
|
Enter the Bank Address, which is the street or mailing address. |
|
5.
|
Enter the City, State & ZIP Code. |
|
6.
|
Enter the Transit Number assigned to this financial institution. This number prints on checks drawn on this bank unless you enter a different number in Transit Number (Chks) below. |
|
7.
|
Enter the client's Account Number at this financial institution. This account is debited when an offsetting settlement entry is created. |
|
8.
|
Enter the Fractional Transit number that appears on checks. This number is the same for all checks drawn on a unique checking account, typically in the format NN/NNN. |
|
9.
|
Enter the Check Title. |
|
10.
|
Enter the Transit Number (Chks) that print on checks drawn on this bank. If this field is left blank, PrismHR uses the Transit Number value. |
|
11.
|
Select Use Positive Pay if this account uses Positive Pay Files. You must also define the layout using the Positive Pay Setup form (see Positive Pay Setup). |
|
12.
|
Enter the Acct Sys ChkID Number. This is the code your accounting software associates with this account and PrismHR uses for reconciliations or receipts. |
|
13.
|
Select One Garn/Pay Chk Cntr to use the same check number sequence for payroll, third party, and garnishment checks. Otherwise, the system uses separate counters for each type. |
|
14.
|
The Next Check Number and Next Garnishment Number display. You cannot modify those values on this form, but the number can be modified using the Managing Next Number Control form. |
|
15.
|
Enter or select the Offset Account ID for the offset settlement checking account. (Use the same ACH originator as this bank account.) |
|
16.
|
Enter or select the Rebate Bill Code if this account belongs to the client. The system uses this code to credit the client for net checks that have been drafted. |
|
17.
|
Enter the MICR Account Number that prints on the MICR line of checks. |
|
18.
|
Enter or select the Employer ID who is the owner of the checking account, from a general ledger point of view. |
|
19.
|
Select Inactive Account if this account is no longer used. |
|
20.
|
Select the ACH Options for this account, if appropriate. |
|
21.
|
Select Use for Garnishments Only to indicate that the account is used only for garnishment payments. This ensures that the account does not stop processing due to XMit Day/Time rules. |
|
22.
|
In the Minimum ACH Window (Days) field, enter the minimum number of days prior to the pay date that your organization must process a batch in order for employees to receive direct deposits. This value overrides the global parameter. |
|
23.
|
Enter the minimum number of days it takes to obtain ACH credit in the Min ACH Receipt Days field. |
This value adjusts the G/L receipt date to correspond with your bank's practices. It also ensures that if you use a negative ACH adjust date for cash receipts, this date is never earlier than the selection made here. If the cash receipt is earlier than the time indicated, the G/L effect adjusts to be this date. This does not change the actual ACH file. For example, enter 0 if you get credit for the same date you send, and enter 1 if you always get credit on the next day.
|
24.
|
Select Show in Cash Receipts if this account should be available for cash receipts. |
|
25.
|
If applicable, enter the Max Void ACH Days, which is the number of banking days this account allows to pass from the Pay Date to Void Date. After that number of days, PrismHR displays warnings. |
|
26.
|
Enter Post Cutoff Time for posting to begin on a payroll batch that uses this checking account. |
|
27.
|
Enable Same Day Processing if the bank account is used for same day processing. (If you enable this field, the system translates this information to the ACH file.) |
Note the following:
|
•
|
If you enable Same Day Processing, the Cutoff Time field displays. Select 1300 (default) or 1700 as the cutoff time. |
|
•
|
If you attempt to finalize a same-day payroll after the defined time/pay date, the following payroll finalization error message displays when the SAMEDAYSTOP custom feature code is enabled at the global level, "Payroll posting after the Same Day Processing cutoff is prohibited. Correct the pay date to continue." (This feature is only available for service providers.) |
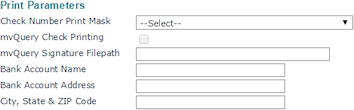
Setting Up Print Parameters
The Print Parameters panel controls how the check print number and signature printed on the check.
|
28.
|
Select the Check Number Print Mask that determines the format of the check number on checks. |
|
29.
|
Select mvQuery Check Printing to enable mvQuery PSE Check Printing. |
|
30.
|
Enter the complete mvQuery Signature Filepath, for example, m:\images\signature.png. This is the location of the check signature file on the mvQuery Print Server. |
|
31.
|
Enter the Bank Account Name, Bank Account Address, and City, State & ZIP Code for this account. |
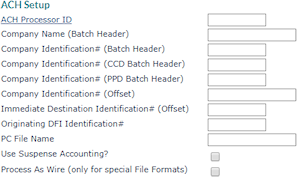
Setting Up ACH Processing Parameters
Use the fields in the ACH Setup panel if this bank account is used for ACH processing. The panel controls the setup of the Batch Header form. The fields that are available depend on whether your organization is using consolidated ACH file processing or standard file processing. Refer to the instructions that match the setup in your system.
Basic Consolidated Processing
When Consolidated ACH File Processing Used in System Parameters is set to Yes, the ACH Setup panel displays as shown below.
|
2.
|
Enter the Company Name (Batch Header), which is the name of the client who owns this checking account. This name appears in positions 5–20 of the Company Batch Header Record. |
|
3.
|
Enter the Company Identification# (Batch Header), which is the client identification number used only on the batch header. Typically, this consists of a 1 followed by the 9-digit EIN. |
|
4.
|
Enter the Company Identification# (CCD Batch Header), which is an optional client identification number used on the CCD batch header. Typically, you enter a value only when advised to do so by your financial institution. |
|
5.
|
Enter the Company Identification# (PPD Batch Header), which is an optional client identification number used on the PPD batch header. Typically, you enter a value only when advised to do so by your financial institution. |
|
6.
|
Enter the Company Identification# (Offset), which is an identification number used on the offset detail form when this account is specified as an offset account. |
|
7.
|
If the service bank requires you to provide a different account number for offset transactions, enter the Immediate Destination Identification # (Offset). |
|
8.
|
Enter the Originating DFI Identification # assigned by the service bank. It is 8 characters and appears on the lines that begin with 52 and 82 in positions 80–87. |
|
9.
|
Enter the PC File Name, which is an optional field used as the base name of files transferred to your computer. The system also appends the date and .txt extension to the end of the name you indicate in this field. |
|
10.
|
Select Use Suspense Accounting if this bank account should use suspense accounting. When selected, ACH transactions are tracked in a “suspense” account and do not move to the cash account until the ACH batch file is created. That allows users to easily reconcile account balances based on transactions processed by the bank. See Suspense Accounts. |
|
11.
|
Do not select Process As Wire (only for special File Formats) unless directed to do so by a PrismHR Customer Support Team representative. It is only for custom-designed file formats. |
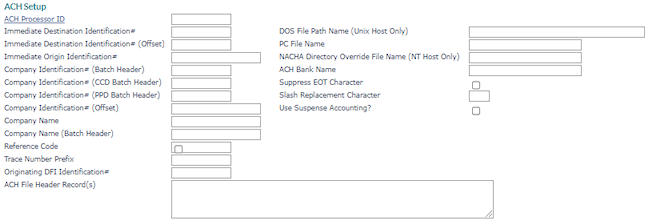
Other Processing
The Company setting uses ACH originators and generates consolidated ACH files sorted by company.
|
2.
|
Enter the Immediate Destination Identification # that identifies the service bank as the destination of ACH input files. |
|
3.
|
If the service bank requires you to provide a different account number for offset transactions, enter the Immediate Destination Identification # (Offset). |
|
4.
|
Enter the Immediate Origin Identification # assigned by the service bank. In the 101 record, this occupies the 10 characters beginning at position 14. If you use headers, this is typically the account number, and could be longer than 10 characters. |
|
5.
|
Enter the Company Identification# (Batch Header), which is the client identification number used only on the batch header. Typically, this consists of a 1 followed by the 9-digit EIN. |
|
6.
|
Enter the Company Identification# (CCD Batch Header), which is an optional client identification number used on the CCD batch header. Typically, you enter a value only when advised to do so by your financial institution. |
|
7.
|
Enter the Company Identification# (PPD Batch Header), which is an optional client identification number used on the PPD batch header. Typically, you enter a value only when advised to do so by your financial institution. |
|
8.
|
Enter the Company Identification# (Offset), which is an identification number used on the offset detail form when this account is specified as an offset account. |
|
9.
|
Enter the Company Name. This can be up to 16 alphanumeric characters, and appears in the 101 record starting at position 64. |
|
10.
|
Enter the Company Name (Batch Header), which is the name of the client who owns this checking account. This name appears in positions 5–20 of the Company Batch Header Record. |
|
11.
|
The Reference Code is optional; use it to refer to your input file for internal accounting purposes. |
|
12.
|
Enter the Trace Number Prefix, which is the first 8 digits of the Trace Number entered in positions 80–94 of the Entry Detail Record. If this field is blank, PrismHR populates it with zeroes. |
|
13.
|
Enter the Company Name (Batch Header), which is the name of the client who owns this checking account. This name appears in positions 5–20 of the Company Batch Header Record. |
|
14.
|
If required, enter the ACH File Header Record(s), which is unique to the financial institution. This information is placed at the beginning of the ASCII file. |
|
15.
|
Enter the full DOS File Path Name (Unix Host Only) to which to download the ACH files built for the checking account. Include the \ (backslash) at the end of the path name. |
|
16.
|
Enter the PC File Name, which is an optional field used as the base name of files transferred to your computer. The system also appends the date and .txt extension to the end of the name you indicate in this field. |
|
17.
|
Enter the NACHA Directory Override File Name (NT Host Only), which is the file name used instead of a standard file name when PrismHR writes to the NACHA directory. |
If your organization uses a bank script to transfer your ACH file to a financial institution that requires the use of a certain file name. If you enter an override file name in this field, the system will always use that file name when writing to the NACHA directory.
This process assumes that there will not already be a file by the same name in the directory when writing to the directory. If it finds an existing file, the system displays a message that gives the user the choice of whether to overwrite the existing file.
|
18.
|
Enter the destination ACH Bank Name used in the header record of the ACH file. If left blank, the system uses the Bank Name. |
|
19.
|
Select Suppress EOT Character to suppress appending the end-of-transmission character (Char(26)) at the end of the ACH deposit file. |
|
20.
|
Enter the Slash Replacement Character that PrismHR replaces with a slash when it builds the ACH file. For example, ^. |
|
21.
|
Select Use Suspense Accounting if this bank account should use suspense accounting. When selected, ACH transactions are tracked in a “suspense” account and do not move to the cash account until the ACH batch file is created. That allows users to easily reconcile account balances based on transactions processed by the bank. See Suspense Accounts. |
