Using SuperBatch
SuperBatch, a payroll processing hub, helps payroll processors oversee each payroll assignment without adding extra work or time. Using a streamlined workflow, you can accomplish all your payroll tasks—entering time data, checking for errors, finalizing and printing—directly from the SuperBatch. For example:
Note: When there is a long list of payrolls the automatic refresh causes the screen to "bounce" and does not return you to the payroll where you were working. To stop this automatic refresh, click the Stop Timer (![]() ) icon at the top of the form. Clicking this "hourglass" icon stops the timer until you click the icon again. (The icon changes to indicate a start/stop status.)
) icon at the top of the form. Clicking this "hourglass" icon stops the timer until you click the icon again. (The icon changes to indicate a start/stop status.)
Working with SuperBatch
SuperBatch allows you to quickly process a large volume of payrolls accurately. In addition, you can view and download any warnings (yellow triangle) or errors (red triangle) in the payroll by clicking the icon. A Payroll Warning or Payroll Errors message displays where you can click Reset Payroll to restart the payroll or click Print to open a report in .csv format, so you can view the warnings or errors and quickly address issues that prevent payroll processing from completing.
Note: All errors and warnings that occur during and after payroll process calculation display the employee's last name, preferred name instead of their last name, first name, if applicable. (If the employee does not have a preferred name, then their last name, first name displays.)
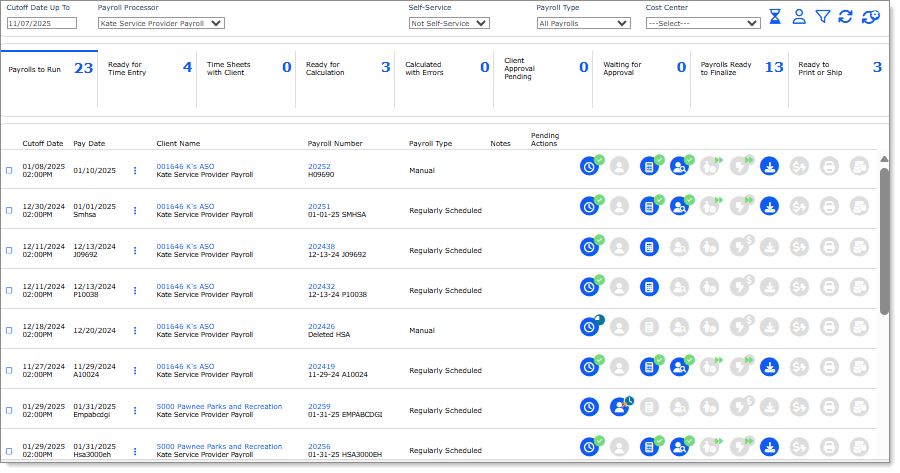
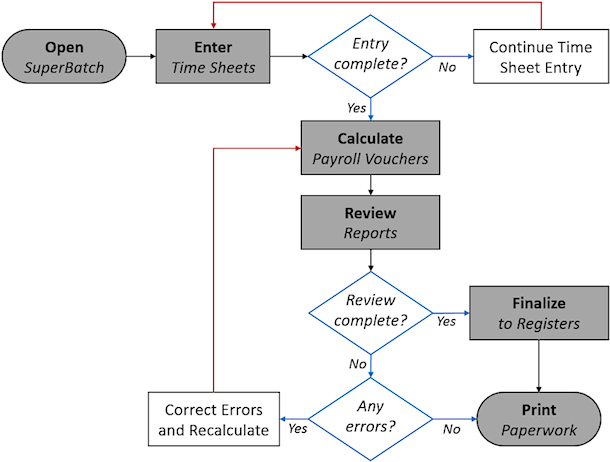
The contents of the SuperBatch form are specific to your user ID. Client payrolls assigned to you that remain incomplete as of the Cutoff Date Up To are the only ones that appear on your SuperBatch form. The basic flow of using SuperBatch appears below.
Using the Filtering Options
You can use the filtering options in the enhanced version of SuperBatch to limit the payrolls that display:
| • | Cutoff Date Up To: Includes all incomplete payroll batches that require payroll processing and are due on or before that date. (The default is the Friday of the current week.) |
Note: You can adjust the lookback period the system uses for the Cutoff Date Up To date by enabling the SUPERBATCHLOOKBACK custom feature code on the System Parameters form. However, note the following when using the SUPERBATCHLOOKBACK custom feature code:
| • | Enabling this custom feature code displays the SuperBatch Lookback Period field on the System Parameters form, where you can adjust the date. |
| • | The default for the SuperBatch process is the standard 95-day lookback period. |
| • | If you enable this field but do not enter a numeric value, the system defaults to the standard 95-day lookback period. |
| • | If you remove the SUPERBATCHLOOKBACK custom feature code, the system hides the SuperBatch Lookback Period field and reverts to the standard 95-day lookback period. |
Note the following about the Cutoff Date Up To filtering option:
| • | The system selects all payrolls by the cutoff date, not the pay date. |
| • | When the Cutoff Date Up To date is greater than the current date, the system selects all payrolls with a pay date greater than or equal to today's date (minus 95 days), plus all payrolls from the current date to the entered pay date. |
| • | When the Cutoff Date Up To date is less than the current date, the system selects all payrolls with a pay date greater than the entered pay date (minus 95 days). |
| • | Payrolls will always display for the Cutoff Date Up To date minus 95 days. For example, if the date entered is 100 days in the past, the system displays payrolls 195 to 100 days in the past. |
| • | Payroll Processor: Payroll representative who is the current active user. In addition, this filter allows you to select all payroll processors. (The incomplete payroll batches assigned to that payroll processor display.) |
Important! If you enable Manager Only Views All SuperBatch Payrolls in the Global Configuration form, Payroll Processor users are only able to view their assigned payrolls and cannot use the SuperBatch Payroll Transfer functionality.
| • | Self Service: The client processes all or some steps of their own payrolls. |
Note: After selecting All Payrolls, "SS" displays next to each payroll's Employees Finalized notation in the Client Level Actions area, so you can easily find all self-service payrolls.
| • | Payroll Type: The payroll batch type. For example, payrolls set to Regularly Scheduled are those payrolls automatically created by PrismHR. |
| • | Cost Center: Filters payrolls based on the selected cost center. |
Note the following:
| • | The cost centers listed in the Cost Center filter option are defined on the Cost Centers form. |
| • | Cost centers are assigned to clients in the Cost Center field on the Client Details form. |
| • | After selecting a cost center, the system filters the payrolls so only clients with the selected cost center display. |
The icons in the top-right corner of the SuperBatch form help you perform the following actions:
| Icon | Description |
|---|---|
|
Payroll Transfer |
Displays the SuperBatch Payroll Transfer form, where you can transfer all currently viewed payrolls or selected payrolls to another payroll processor. (Select the payroll processor and click Update.) Note: If you select multiple payrolls and then click this icon to change to a new payroll processor, only the payrolls you selected are updated, not those in the entire view. |
|
Filter Selection |
Displays a search form, where you can enter information to narrow the payroll assignments that display. (Enter the search information and click Apply.) |
|
Refresh Existing Filter |
Refreshes payrolls that display based on the existing user and selected filters/settings. Note: This filter can also act as a "reset" for payrolls. |
|
Reset Filters |
If you filtered the payrolls to only display payrolls associated with a particular step, select this icon to refresh the display so all payrolls associated with the selected filters redisplay. |
Working with the Ribbon
A ribbon displays the steps for the payrolls in-progress. For example:

Note: Each step displays the number of payrolls associated with it.
To further filter the payroll display, click a step in the ribbon to display all the payrolls in that step. (Some of these filters can include several statuses, which you can select as a group or individually.) For example, clicking Ready for Time Entry in the example above displays the payrolls matching that criteria:
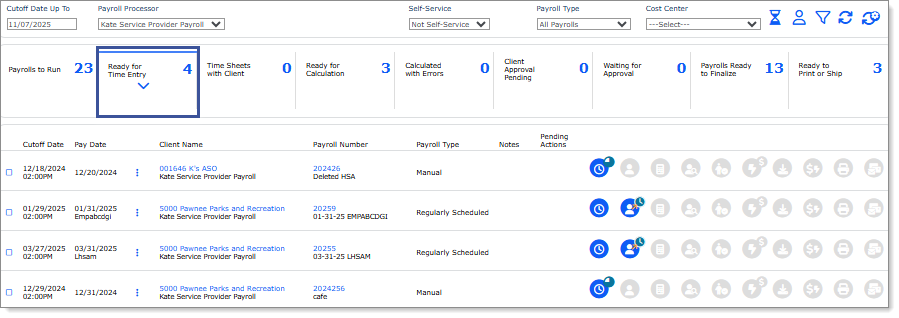
Note: A blue selection bar and chevron down arrow display within a step when you click it, so you can easily determine which step is selected in the ribbon.
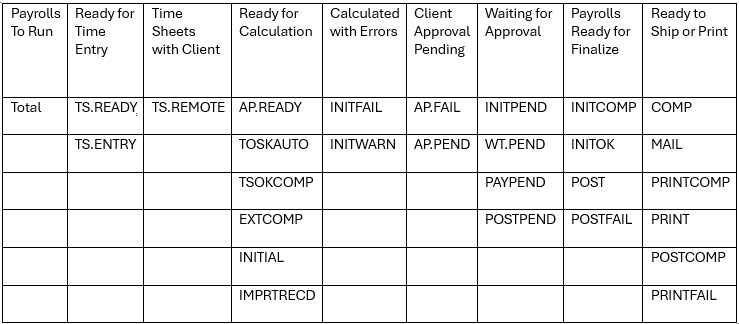
Payroll Statuses Associated with Each Group
Accessing the Payroll Features
You can access payroll-related features for a payroll by clicking the links listed in the Client Level Actions area. For example, click the link in the Payroll Number column to open the Payroll Control form, which displays details about that payroll. (Each form opens as a layer over SuperBatch, so that you do not lose your place and can return to SuperBatch easily.)

| To do this: | Select this: |
|---|---|
|
Access additional actions for selected client or payroll |
Ellipsis ( |
| Access Client Details form displaying selected client's details | Client name or client ID |
| Access Payroll Control form displaying selected payroll's details | Payroll number |
| Access Payroll Notes form for selected payroll or create a new note | Notes ( |
Accessing Actions and Reports Menu
You can quickly access the options described below by selecting the Ellipsis icon (![]() ). For example:
). For example:
![]()
A window opens where you can select from the following options:
|
Option |
Description |
|---|---|
| Bill Pending | Lists billing events that will occur during the next scheduled billing date (in other words, they are pending). These billing events can be created on this form or generated automatically by PrismHR. |
| Company Details | Maintain company information and settings. |
| Employee Details | Maintain employee information and settings. |
| New Hire Entry | Enter a newly hired employee’s information. |
| Pay Rate Change | Set a new pay rate for an employee. |
| Payroll Control | Establish essential information for processing payroll. |
| Payroll Approval | After payroll processor calculates the payroll, PrismHR sends a message to the payroll approver that the payroll is ready for review and approval. |
| Rehire | Rehire a terminated employee. |
| Payroll Validation | Generate listing of validation errors for the selected payroll number. |
| Payroll Information | Displays payroll information, such as payroll approval client, assigned payroll process user, delivery method, and remote timesheet entry client. |
|
Payroll Allocation |
Determines the format for the payroll costs that are distributed across multiple cost centers such as departments, divisions or locations. |
|
Payroll Variance Analysis |
Opens the Payroll Variance Analysis dashboard, where you can review relevant payroll information and compare two payrolls on a single dashboard to simplify the review process. |
Note: When you select an option, the client's or payroll's information automatically displays.
Note the following:
| • | If you do not have access or are denied access to a form that displays in the Actions list, that option does not display. |
| • | If you do not have access or are denied access to all of the forms, the Actions header does not display. |
| • | If you do not have access or are denied access to all of the Actions and Reports the following message displays, "No actions and reports available. Contact your administrator." |
| • | If you have Inquiry access to a form, that option displays in the Actions list. |
SuperBatch Processing Steps
The steps involved in SuperBatch processing are:
| 1. | Viewing Payroll Batches in SuperBatch |
| 2. | Entering Time Sheets |
| 3. | Calculating Payroll Vouchers |
| 4. | Reviewing a Payroll Batch |
| 5. | Performing Payroll Batch Approval (if required for client) |
| 6. | Finalizing Payroll |
| 7. | Printing and Mailing Payroll Batches |
Using the Actions Menu
You can access other information and features using the Actions menu:
| • | Add Employee to Payroll: Enter or select an employee to add to a payroll. (See the Payroll Processing Guide.) |
| • | Change Processor: Change the processor for one or more payrolls. (See the Payroll Processing Guide.) |
| • | Client Bill Pending: Review the billing events that will occur during the next scheduled billing date (see the Client Administration Guide), or click New Entry to enter a billing item or view the details of an existing one (see the Client Administration Guide). |
| • | Employee Loans: Establish employee loan information, track the payment of the loan, or view loan payments that were deducted from employee paychecks. (See the Payroll Administration Guide.) |
| • | Process Payroll: Enter time sheet information, calculate the payroll, finalize the payroll, run the Payroll Validation Report, update employee and payroll records, review/download errors and warnings, and print the vouchers. (See the Payroll Processing Guide.) |
| • | Recurring Deduction Overrides: Temporarily override one or more deductions for a specified employee's paycheck. (See the Payroll Overrides Guide.) |
| • | Recurring Deductions: Enter voluntary deductions for the selected employee. (See the Payroll Administration Guide.) |
| • | Scheduled Deductions: Establish a one-time or temporary deduction for the employee. (See the Payroll Overrides Guide.) |
| • | Scheduled Payments: Establish payments for a specific date in the future or repeat them each pay period during a specified time period. (See the Payroll Overrides Guide.) |
| • | Tax Calculation Overrides: Temporarily override the way the system calculates taxes for an employee. (See the Payroll Overrides Guide.) |
| • | Vacation Pay Override: Overriding vacation voucher calculations. (See the Payroll Overrides Guide.) |
Performing Payroll Batch Approval
